Here, 3 science projects for toddlers with a Valentine’s Day theme. Share some one-on-one time as you experiment with ice, water and an erupting volcano!
By Haley Burress
Preschoolers and younger elementary school kids are already great scientists. They are naturally curious about the world around them. They observe changes and want to know how things work. Plus, they are really good at asking questions. Lots and lots of questions. This February, embrace the chilly weather and your preschooler’s incessant “why” questions, and try out some of our science experiments. We love these because they are easy — and because you probably have everything you need in the house right now. Plus, these experiments have an extra-fun twist and are all Valentine’s Day themed. Try them out with your curious kiddo, and watch your day turn into an exciting and educational event.
Shop for toddler classes near you >>
Preschool Science Project #1: Valentine’s Freezers
Teach your child about solids and liquids by letting them create some festive ice cubes. Here at my house, my 4-year-old son is really into talking about solids and liquids (we have this whole interpretive dance about each of the phases of matter), so this one was a no-brainer.
To start, we rounded up anything that he thought was related to Valentine’s Day and that we already had here at home. Anything we gathered had to be able to withstand being in water. He took his job of gathering items very seriously, and what I thought was just going to be a quick roundup ended up being a fun part of the activity. His treasures included a few festive beaded necklaces, a flower from the corsage he got me at our Mom-Son dance, some heart cookie cutters, and a dinosaur (red, of course).
Next, we found small containers that would be our ice cube molds. This was easy enough, and I had plenty of small containers left from his homemade baby food days. I pulled out some food coloring from the cabinet, and he pulled his stool up to the kitchen sink. He filled up the containers with water; I let him decide how full he wanted them, as it’s his experiment and he loves to make the decisions. Next, he submerged his treasures in the water containers and added a few drops of food coloring to some of the containers as well. Since we live in blustery Chicagoland, we put the containers on a cookie sheet and set it right outside on our backyard table. If you live in an area where your temperatures get below freezing, definitely put your ice treasures outside to freeze, as it was fun checking on them through the window. (If not, your freezer will do the trick just as nicely.) After only a few hours, our ice was frozen solid.
A quick dip in warm water helped the ice blocks slide out easily, and we put them back on the cookie sheet to help contain the watery mess. Playing with the ice is great sensory play, and it is fun to peer inside the solid ice to see your treasure. My son liked experimenting on how to get the treasures out the quickest. He tried baths in a bowl of warm water, a hammer and a nail (with supervision, of course), and even salt. If you are doing this experiment, you definitely need to try out salt on at least one. Sprinkle some on an ice block and, after the salt sits for a minute or so, add a drop of food coloring to see what happens.
As he experimented and freed his treasures, we were able to talk about where he thought the water from the ice went, and other examples of things that turn from liquid to solid or vice versa. Kiddos up to the age of 8 will enjoy this simple activity, and it is interesting to see them make observations and hypotheses, as well as draw conclusions from what they have seen.
Shop for toddler classes near you >>
Preschool Science Project #2:
Water Walkers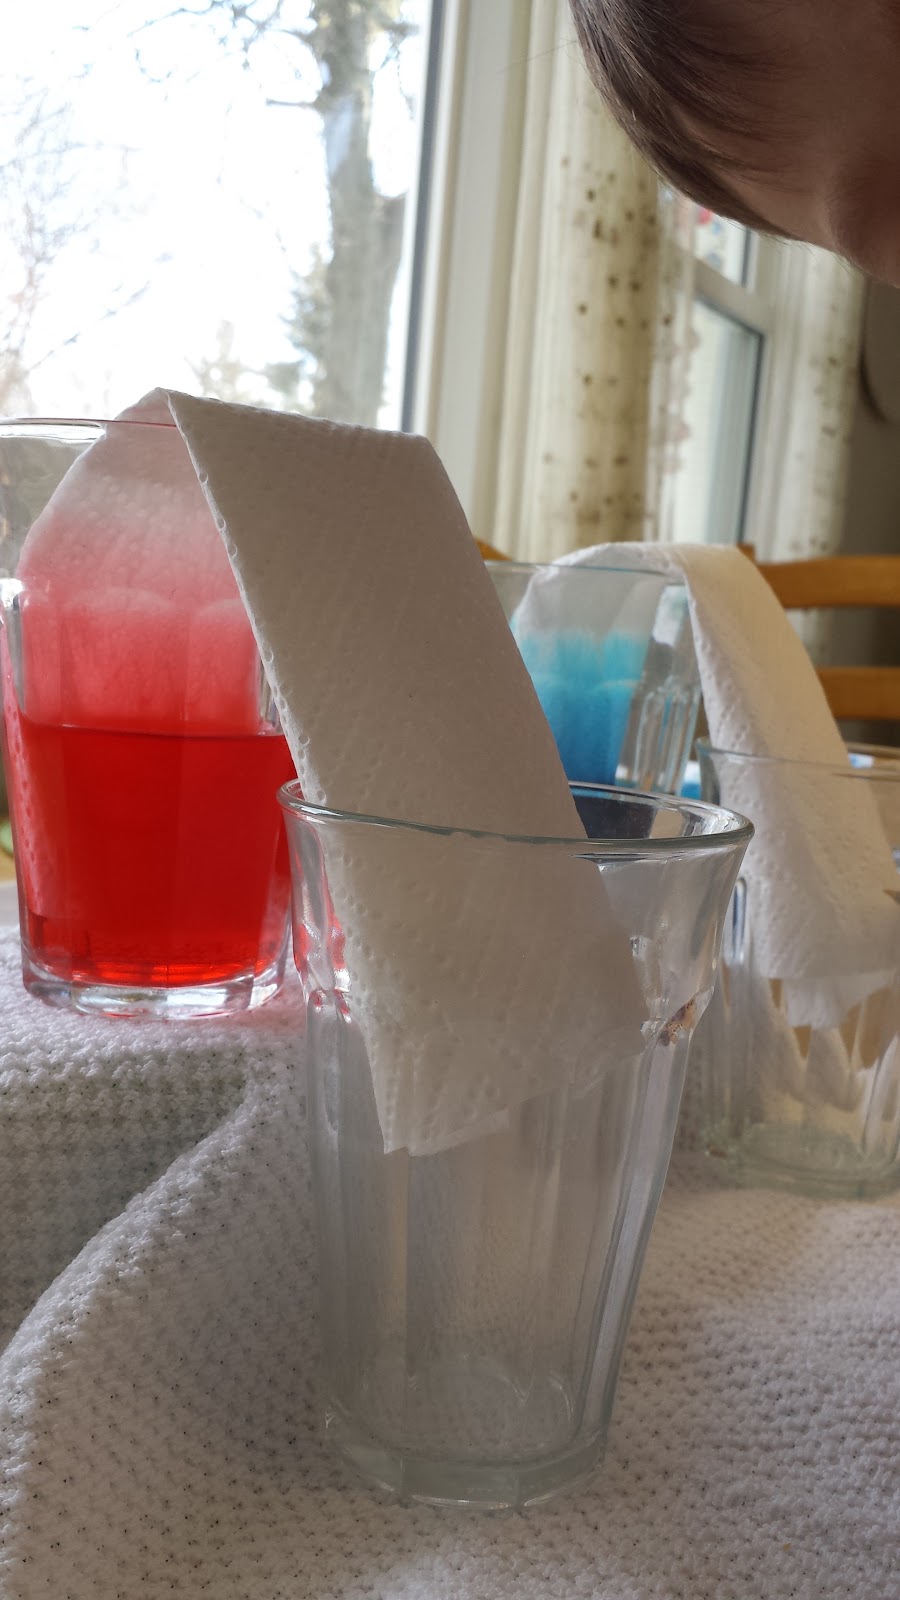
Tease your child and tell them that you can get water to walk from one glass to another. They’ll be hooked and follow you right to the kitchen to set up this easy experiment. Fill a glass or two with water and add food coloring (Valentine’s colors, of course). Set the glass up on an overturned bowl and place an empty glass on the table near it. Cut a strip of paper towel and put one end in the water and the other end in the empty glass. That’s it — easy peasy.
The next part is all about observation. Watch the color climb up the paper towel and then down into the empty glass below. In a matter of time, the water has “walked” to the empty glass. Jazz things up a bit by having a glass with red water and a glass with blue water dripping into one common cup. What color will the water become as the waters mix?
Since this experiment is pretty easy, you can spend some extra time mixing up the variables and making theories of what will happen. Double up the paper towels or even try toilet paper. Try warm water versus cold water. Let your little scientist make the decisions, and try out what he wants. Part of the fun is trying new things together, even if the result doesn’t change.
Preschool Science Project #3: Homemade Volcanoes
My son could make a homemade volcano every day and never tire of it. We put a spin on this classic science experiment by watching what happened when a red volcano and a blue volcano erupted on the same cookie sheet.
Whether you choose to make your volcano out of clay, paper-mache, or in our case, old Play-Doh, you are winning. Sometimes we skip the volcano part entirely and just head straight to the eruption because that’s the best part anyway. But even if we skip the volcano part, we always add a scene on our cookie sheet. Sometimes Superman and the Justice League are right in the evil volcano path, and sometimes dinosaurs are minding their own business only a few inches away from the volcano. This pretend play is an important part of our volcano experimenting.
But back to the eruption. In a small container (we might use leftover Hard Rock Cafe shot glasses from college days), add a few spoonfuls of baking soda, a few drops of food coloring, and a squirt of dish soap. Once you are ready, start a countdown to add your eruption agent: a pour of white vinegar (maybe an ounce or so). Commence oooohs and aaaaahs and general happiness from your little scientist.
While you can certainly stop there, it is more fun to experiment with your variables again. What will happen if you leave out the dish soap? If you try baking powder instead of baking soda? If you add water instead of vinegar? This experimentation is where the learning happens.
You might be surprised when you glance at the clock and notice that one of these experiments has kept your kiddo engaged for over an hour. And you just might learn something new too. Everyone wins here, which is why we heart preschool science!
Shop for toddler classes near you >>

